How to use iPhone calendar on Mac without any accounts
Use ICS Toolkit to connect your iPhone calendars to Apple Calendar on your Mac over local Wi-Fi, or move them with an ICS file. No cloud calendar signup required.
Your calendar is on your iPhone, but planning a week or moving appointments around is easier with a keyboard and a larger screen. You want to use Calendar on your Mac without signing into a calendar service on that computer.
ICS Toolkit gives you two ways to do that. Server Mode connects the Mac directly to selected calendars on your iPhone over your local network. Export Calendars saves events to an .ics file that you can transfer and open on the Mac.
One detail about “without any accounts”: ICS Toolkit requires no registration, and neither workflow requires a new cloud calendar account. For Server Mode, macOS still asks you to add a local CalDAV “account” using credentials supplied by the app. If you want to avoid adding even that connection, use the file transfer method.
What you need
- An iPhone with ICS Toolkit and the calendars you want to access.
- A Mac with Apple’s built-in Calendar app.
- For Server Mode, both devices on the same trusted local network, such as your home Wi-Fi.
- Full Calendar Access for ICS Toolkit, plus Local Network permission if iOS asks when you start the server.
The screenshots in this article show ICS Toolkit 1.2.2 with example calendars. Use the connection values displayed on your own iPhone when following the steps.
 View full size
1. Choose which iPhone calendars to share
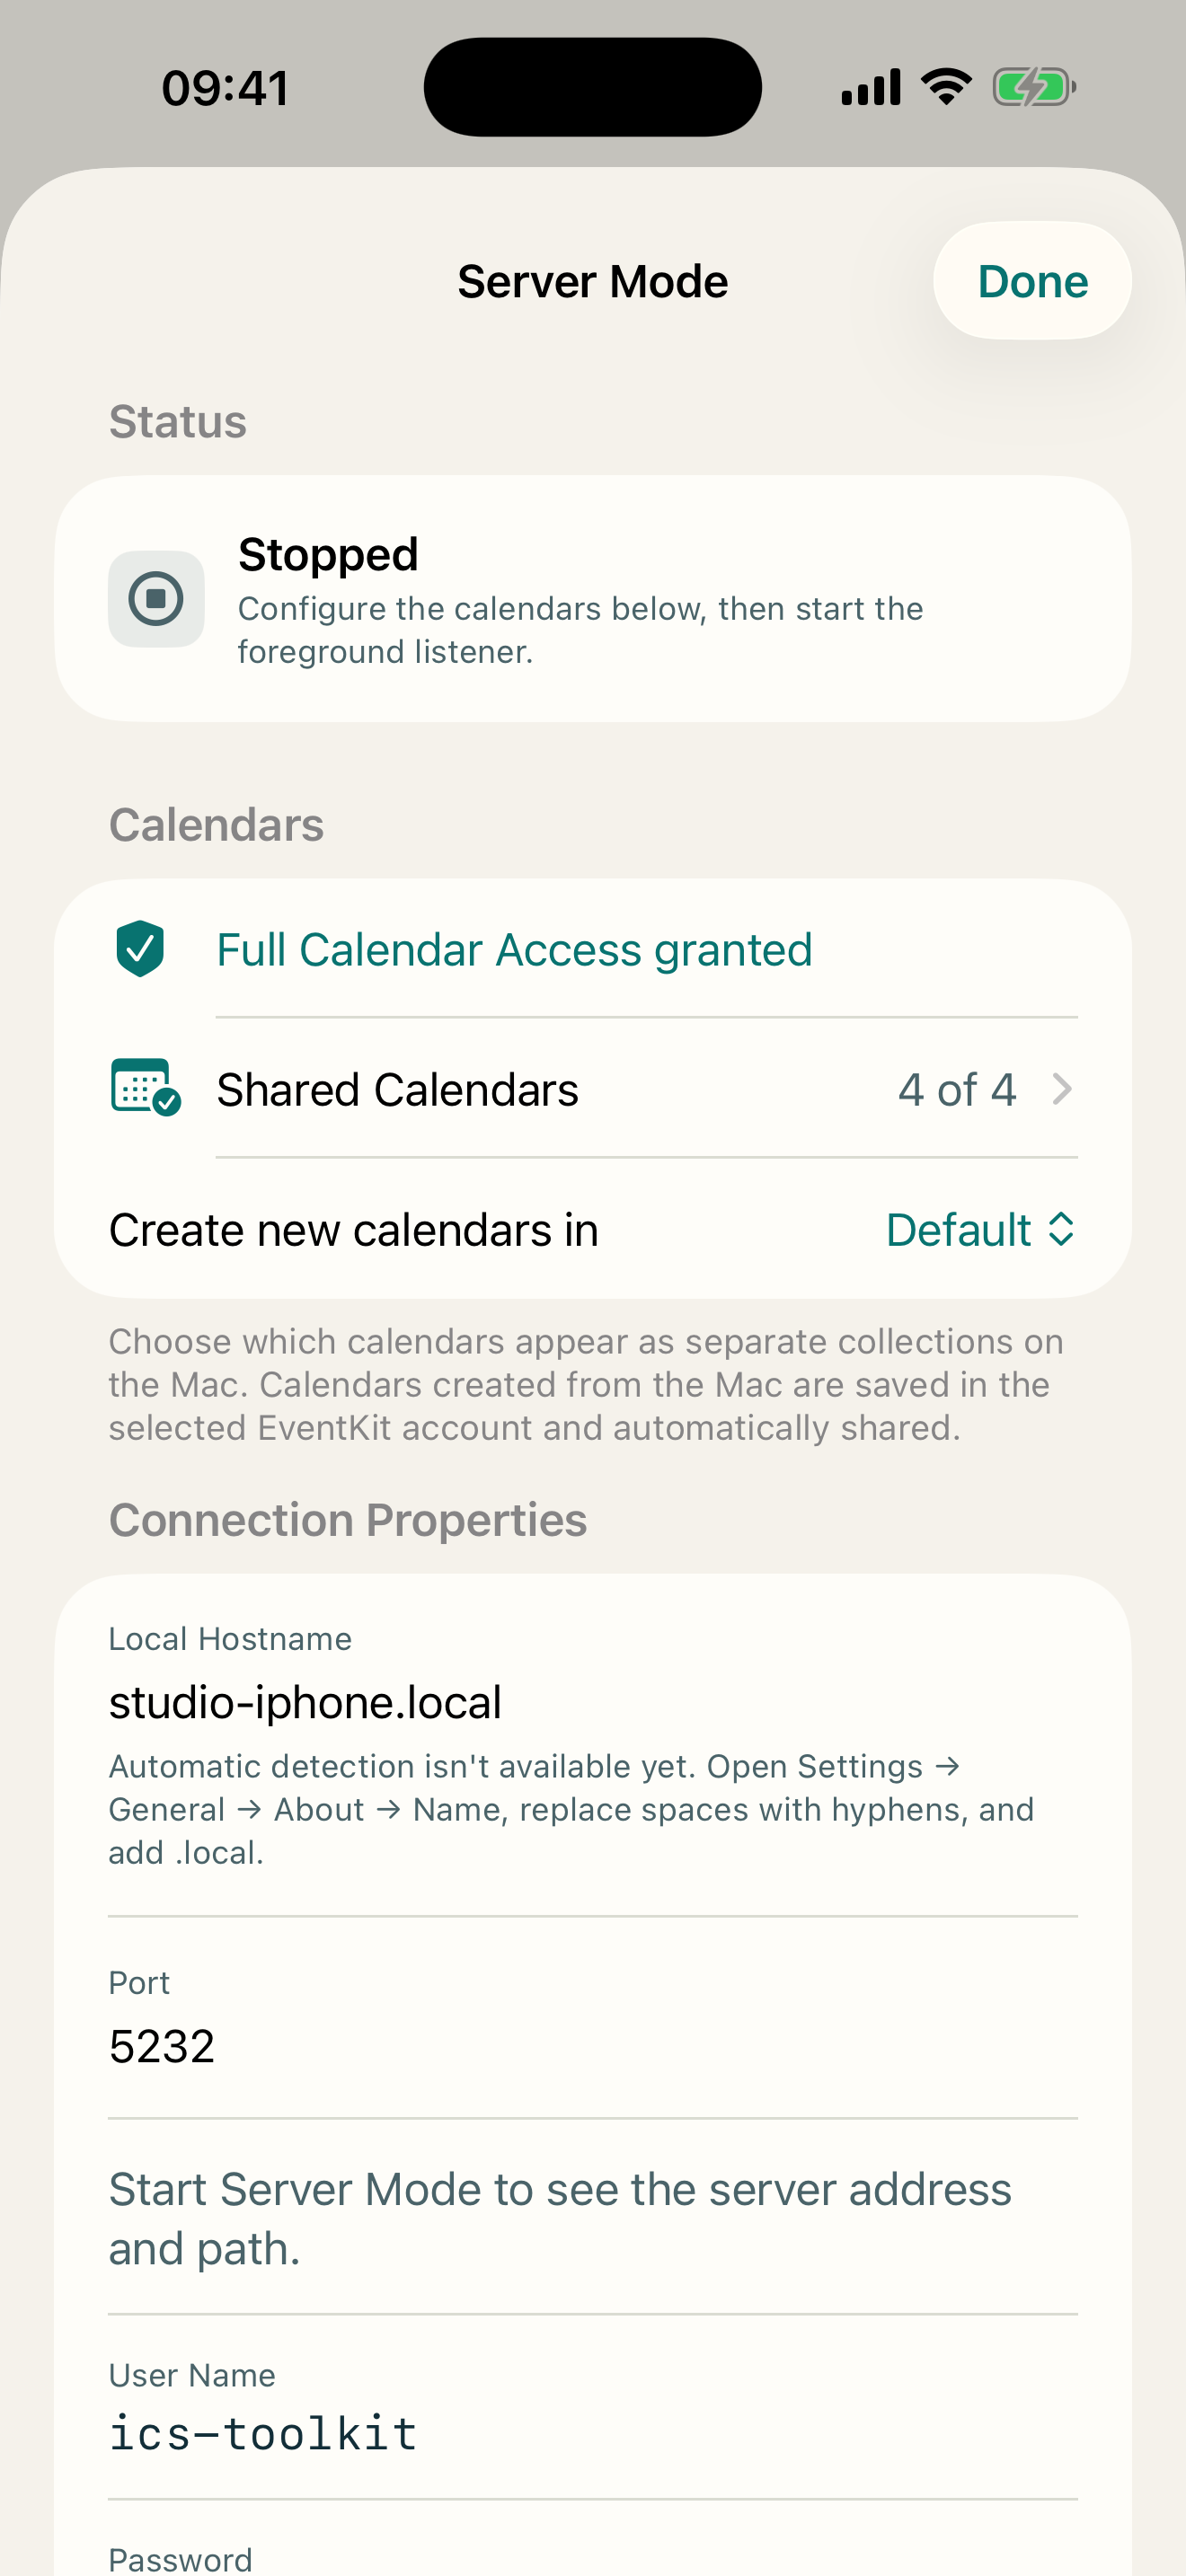
Open ICS Toolkit and tap Server Mode. Allow Full Calendar Access, then open Shared Calendars and select the calendars you want to see on your Mac. You can start with just one.
The Create new calendars in setting controls where calendars created from the Mac will be saved on the iPhone. Choose the destination you intend to use before starting the server.
Server Mode works with calendars already available on the phone. If one of those calendars belongs to iCloud, Google, or another provider, its existing sync behavior still applies. The local connection does not turn a cloud calendar into a device-only calendar.
2. Start Server Mode
Scroll down and tap Start Server Mode. Allow Local Network access if prompted. The app will display the connection details your Mac needs, including the server address, server path, port, username, and password.
Keep ICS Toolkit open and active on the iPhone while you connect and work. The server stops when the app goes into the background and must be started again manually. For longer sessions, connect the phone to power and use Prevent Auto-Lock while serving.
Server Mode uses HTTP with Digest authentication. Digest protects the password, but calendar names and event contents travel without encryption. Use this connection only on a trusted local network.
 View full size
3. Connect Apple Calendar on the Mac
In Calendar on your Mac, choose Calendar → Add Account → Other CalDAV Account, then set Account Type to Advanced. Apple’s guide to adding calendar accounts describes this setup screen.
Copy the values from ICS Toolkit’s Connection Properties into the corresponding fields:
| Mac Calendar field | What to enter |
|---|---|
| User Name | The username displayed in ICS Toolkit. |
| Password | The app’s pairing password. Use Reveal Password or Copy Password on the iPhone. |
| Server Address | The Server Address shown after starting Server Mode. |
| Server Path | The Server Path shown by the app, including its slashes. |
| Port | The port displayed on the iPhone. |
| Use SSL | Off, as shown in ICS Toolkit. |
If your setup screen offers an authentication choice, use Automatic or Digest. Complete the setup and leave the iPhone app open while Calendar loads the selected calendars. The first synchronization can take a little time.
These credentials belong to the connection to your iPhone. You do not need to enter an Apple, Google, or Microsoft password.
4. Work with your calendar on the Mac
Select one of the shared calendars in Calendar’s sidebar. You can view its events and, if the underlying calendar allows changes, create, edit, and delete events from the Mac. Those changes are written back to the calendar on your iPhone.
For a quick check, create a temporary event in a shared writable calendar on the Mac. Give synchronization time to finish. Then open Calendar on the iPhone and check that the event arrived. Switching away from ICS Toolkit stops the server, so reopen the app and start Server Mode again before continuing on the Mac.
When you are finished, tap Stop Server Mode. This is a connection you run while you need it; it does not keep syncing in the background or when your devices leave the local network.
If the Mac cannot connect
- Confirm that ICS Toolkit is still open and Server Mode is running.
- Check that both devices are on the same trusted local network and that ICS Toolkit has Local Network permission. A guest network may keep devices from communicating with each other.
- Compare the server address, path, port, and credentials with the values currently shown on the iPhone. Check that SSL is off.
- If the connection works but a calendar is missing, check Shared Calendars and Full Calendar Access. Allow time for the initial synchronization.
Transfer a calendar without adding an account
If you only need a copy of your events on the Mac, export an ICS file. An .ics file is a calendar document that Apple Calendar can import. This workflow needs no CalDAV connection and no running server.
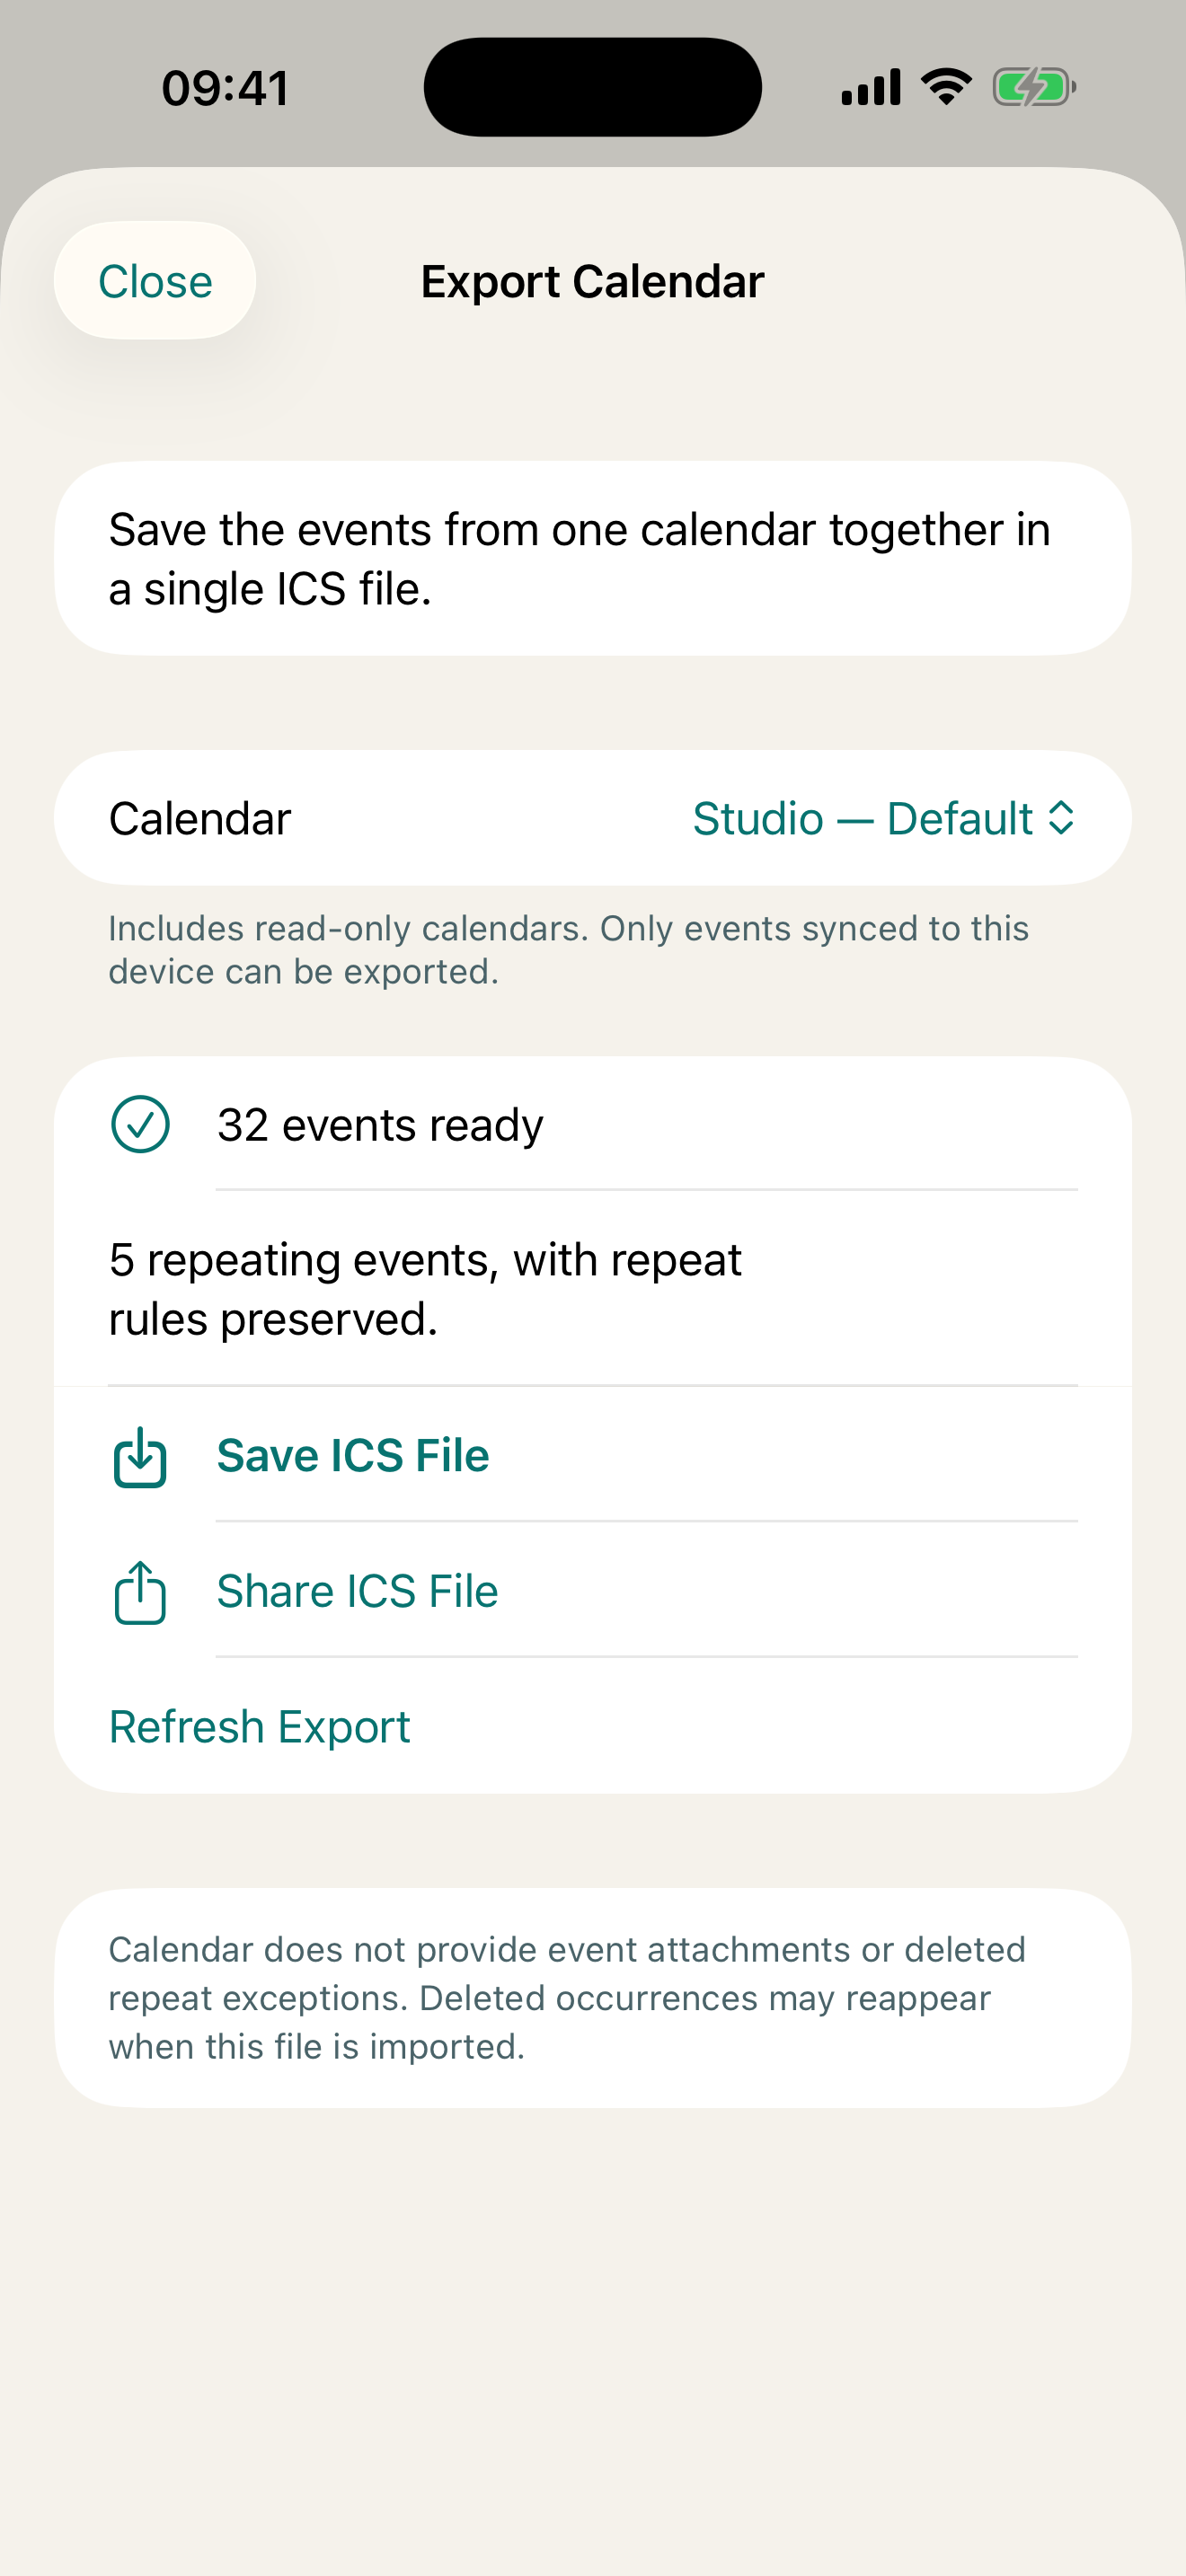
- In ICS Toolkit, open Export Calendars and allow Full Calendar Access.
- Select the calendar to export and wait for the event count to appear.
- Tap Share ICS File to send the file to the Mac, for example with AirDrop. You can also choose Save ICS File and transfer the saved file yourself.
- On the Mac, open Calendar and choose File → Import. Select the
.icsfile. - Choose a destination calendar and complete the import. Use a calendar in On My Mac to keep the imported copy local to that computer.
Apple’s calendar import guide also explains how to create a destination calendar or drag an ICS file directly into Calendar.
An imported file is a separate copy. Later edits on the Mac do not update the iPhone, and later iPhone changes do not update that copy. Repeated imports can also create duplicates, so use a separate destination calendar if you are trying the workflow for the first time.
ICS Toolkit exports the events available on the device, including events from read-only calendars. It preserves repeat rules and edited occurrences, but iOS does not provide event attachments or all deleted repeat exceptions for calendar export. Deleted occurrences may reappear after import, so check repeating events in the imported copy.
 View full size
More ways to use ICS Toolkit
The same app can create an event file, open a multi-event ICS file to find and edit an individual event, or import events into a writable iPhone calendar. Its editor supports time zones, repeat rules, reminders, and invitations, with a compatibility review before saving or sharing.
For the workflow in this article, start with one calendar: connect it through Server Mode if you want to work on the same events from the Mac, or export it if a local copy is enough.